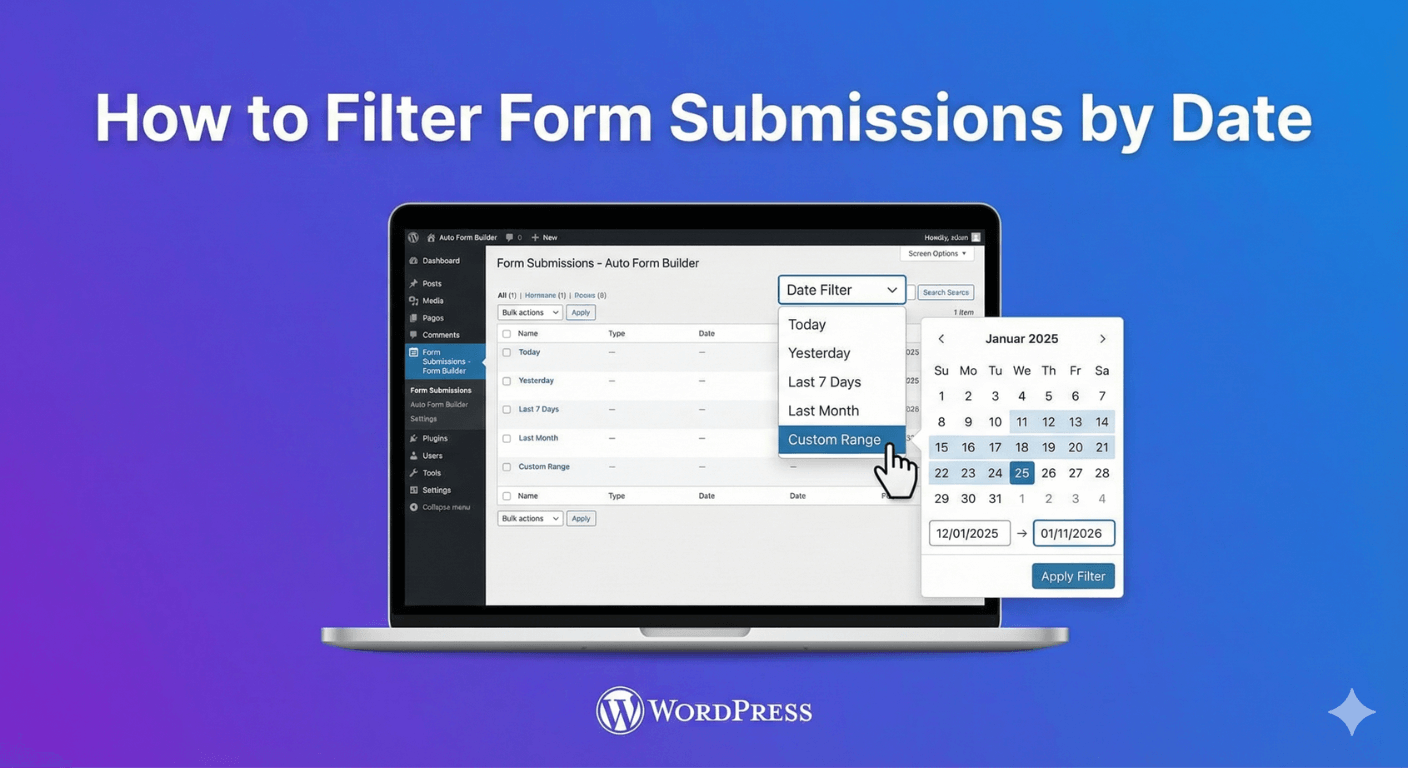
How to Filter Form Submissions by Date
When you have hundreds or thousands of form submissions, finding entries from a specific time period can feel overwhelming. Date filtering lets you instantly narrow down submissions to exactly the timeframe you need—whether that’s today’s entries, last month’s leads, or a custom date range.
In this guide, you’ll learn how to filter form submissions by date in WordPress using Auto Form Builder.
Why Date Filtering Matters
Common Scenarios
- Daily review: Check today’s submissions
- Weekly reports: Export last 7 days of entries
- Monthly analysis: Review a specific month’s data
- Campaign tracking: Find submissions during a promotion
- Issue investigation: Locate entries around a specific date
Benefits of Date Filtering
- Save time—no manual scrolling
- Focus on relevant entries
- Generate accurate reports
- Track trends over time
- Export specific date ranges
Date Filter Options in Auto Form Builder
Auto Form Builder provides several ways to filter submissions by date:
Quick Date Filters
| Filter | Shows Submissions From |
|---|---|
| Today | Current day only |
| Yesterday | Previous day only |
| Last 7 Days | Past week including today |
| Last 30 Days | Past month including today |
| This Month | Current calendar month |
| Last Month | Previous calendar month |
| This Year | Current calendar year |
| All Time | All submissions (no filter) |
Custom Date Range
For specific periods:
- Select start date
- Select end date
- View submissions within that range
How to Filter Submissions by Date
Step 1: Access Submissions
- Go to AFB in your WordPress admin
- Click Submissions
- You’ll see all form submissions listed
Step 2: Locate Date Filter
Find the date filter dropdown near the top of the submissions list, typically alongside other filters like form selection and search.
Step 3: Select Date Range
Using Quick Filters
- Click the date filter dropdown
- Select a preset option (Today, Last 7 Days, etc.)
- Submissions instantly filter to that period
Using Custom Date Range
- Click the date filter dropdown
- Select “Custom Range” or similar option
- Choose your start date using the date picker
- Choose your end date
- Apply the filter
Step 4: View Filtered Results
The submissions list updates to show only entries within your selected date range. The count updates to reflect filtered results.
Combining Date Filters with Other Filters
Date + Form Filter
Filter by both date and specific form:
- Select the form you want to view
- Apply date filter
- See only that form’s submissions from that period
Example: “Contact Form submissions from last month”
Date + Search
Combine date range with text search:
- Apply date filter
- Enter search term
- Results show matching entries within date range
Example: “Find all submissions containing ‘urgent’ from this week”
Date + Status Filter
Filter by date and submission status:
- Apply date filter
- Select status (Read, Unread, Starred)
- See matching submissions
Example: “Unread submissions from today”
Multiple Filters Together
Combine all filters for precise results:
- Form: Contact Form
- Date: Last 30 Days
- Status: Unread
- Search: “quote”
Result: Unread Contact Form submissions from the last 30 days containing “quote”
Practical Use Cases
Use Case 1: Daily Review
Goal: Check all new submissions each morning
Steps:
- Go to Submissions
- Filter by “Today” or “Yesterday”
- Review and respond to each entry
- Mark as read when handled
Use Case 2: Weekly Report
Goal: Generate weekly submission report
Steps:
- Filter by “Last 7 Days”
- Note total count
- Export to CSV if needed
- Analyze trends
Use Case 3: Monthly Analysis
Goal: Compare submissions month over month
Steps:
- Filter by “Last Month”
- Export or note count
- Filter by “This Month”
- Compare numbers
Use Case 4: Campaign Tracking
Goal: See submissions during a specific promotion
Steps:
- Select Custom Date Range
- Enter campaign start date
- Enter campaign end date
- View all submissions from that period
Use Case 5: Issue Investigation
Goal: Find submissions around a reported problem
Steps:
- Use Custom Date Range
- Set range around the issue date
- Search for affected user’s email
- Locate the specific submission
Exporting Date-Filtered Submissions
Export Specific Date Ranges
After filtering by date:
- Apply your date filter
- Click Export
- Choose format (CSV, JSON, XML)
- Export contains only filtered submissions
Export Examples
- Monthly backup: Filter “Last Month” → Export all
- Quarterly report: Custom range (3 months) → Export CSV
- Annual archive: Filter “This Year” → Export all
Date Filtering Best Practices
1. Establish a Routine
Regular filtering habits:
- Check “Today” each morning
- Review “Last 7 Days” weekly
- Analyze “Last Month” for reports
2. Use Quick Filters for Common Tasks
Quick filters are faster than custom ranges:
- “Today” for daily review
- “Last 7 Days” for weekly check
- “This Month” for current period
3. Save Time with Combined Filters
Combine date with other filters:
- Unread + Today = New items to handle
- Starred + Last 30 Days = Important recent items
4. Export Before Deleting
When cleaning old submissions:
- Filter to date range you’ll delete
- Export as backup
- Then delete if needed
5. Note Date Filter When Reporting
When sharing data:
- Always specify the date range
- “50 submissions (Jan 1-31, 2026)”
- Prevents confusion about totals
Understanding Submission Dates
What Date Is Recorded?
The submission date reflects:
- When the user clicked Submit
- Server timestamp at processing
- Your WordPress timezone setting
Timezone Considerations
If your visitors are in different timezones:
- Submissions use server time
- A visitor at 11 PM their time might show as next day
- Consider this for international audiences
Date Display Format
Dates typically display:
- Relative: “2 hours ago”, “Yesterday”
- Absolute: “Jan 10, 2026 at 3:45 PM”
- Both for clarity
Troubleshooting Date Filters
No Results Found
Possible causes:
- No submissions in selected range
- Combined filters too restrictive
- Wrong form selected
Solutions:
- Try broader date range
- Remove other filters temporarily
- Select “All Forms” to check
Expected Submission Not Showing
Possible causes:
- Timezone difference
- Date range off by one day
- Submission hasn’t synced yet
Solutions:
- Expand date range by a day each direction
- Check timezone settings
- Refresh the page
Filter Not Applying
Possible causes:
- Browser caching
- JavaScript not loading
Solutions:
- Hard refresh (Ctrl+Shift+R)
- Clear browser cache
- Try different browser
Advanced Date Analysis
Identifying Trends
Use date filters to spot patterns:
- Which days get most submissions?
- Morning vs. afternoon patterns?
- Seasonal variations?
Comparing Periods
Compare month to month:
- Filter January → Note count
- Filter February → Note count
- Calculate growth/decline
Tracking Campaign Performance
Before and after campaigns:
- Filter week before campaign → Baseline
- Filter during campaign → Campaign performance
- Filter week after → Lasting effect
Frequently Asked Questions
Can I filter by exact time, not just date?
Most form plugins filter by date only. For time-specific searches, export to CSV and filter in spreadsheet software.
Do deleted submissions appear in date filters?
No, deleted submissions are removed from all views including filtered results.
Can I save custom date filters?
Quick filters are preset. For frequently used custom ranges, note the dates and reapply as needed, or bookmark the filtered URL if supported.
How do I export only filtered submissions?
Apply your date filter first, then use the export function. The export respects active filters.
What timezone are submissions recorded in?
Submissions use your WordPress site’s timezone setting (Settings → General → Timezone).
Summary
Filtering form submissions by date:
- Access submissions – Go to AFB → Submissions
- Use quick filters – Today, Last 7 Days, This Month, etc.
- Use custom ranges – Select specific start and end dates
- Combine with other filters – Form, status, search
- Export filtered results – Date filter applies to exports
- Establish routines – Daily, weekly, monthly reviews
Conclusion
Date filtering transforms submission management from overwhelming to organized. Instead of scrolling through thousands of entries, you can instantly find submissions from any time period—today’s new leads, last month’s data, or a specific campaign window.
Auto Form Builder provides quick date filters for common timeframes and custom date range selection for specific needs. Combine date filters with form, status, and search filters to find exactly what you’re looking for.
Ready for organized submission management? Download Auto Form Builder and take control of your form data.