How to Show and Hide Form Fields Based on User Answers

Long forms scare users away. But sometimes you need to ask many questions—just not all of them to everyone. Conditional logic shows fields only when relevant, creating forms that adapt to each user’s answers.
In this guide, you’ll learn how to show and hide form fields based on user responses, creating smarter, more personalized forms.
What Is Conditional Logic?
Conditional logic (also called conditional fields or branching logic) automatically shows or hides form fields based on previous answers.
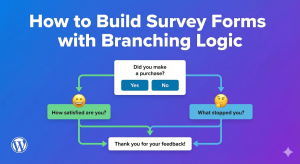
How It Works
IF [user selects/enters something] THEN [show/hide a field]
Simple Example
Question: “Do you have dietary restrictions?”
- If Yes → Show “Please describe your dietary needs” field
- If No → Skip to next question
Users who answer “No” never see the follow-up question. The form stays short and relevant.
Why Use Conditional Logic?
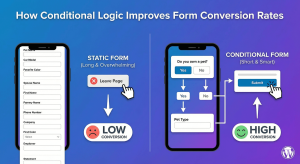
Shorter Forms
Users only see questions that apply to them:
- 10-question form might show only 5-6 to most users
- Reduces form abandonment
- Faster completion times
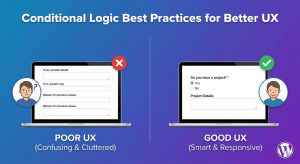
Better User Experience
Relevant questions feel personalized:
- No confusing irrelevant fields
- Form adapts to user’s situation
- Feels like a conversation
Cleaner Data
No empty or N/A responses:
- Only collect data when applicable
- Fewer blank fields in submissions
- More meaningful responses
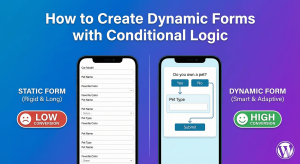
Professional Appearance
Dynamic forms look sophisticated:
- Shows attention to detail
- Builds trust with users
- Modern form experience
Common Conditional Logic Examples
Yes/No Follow-ups
Trigger: “Are you currently employed?”
- Yes → Show: “Company name,” “Job title,” “Years employed”
- No → Show: “Are you seeking employment?”
Category-Specific Questions
Trigger: “What type of inquiry is this?”
- Sales → Show: “Budget range,” “Timeline,” “Company size”
- Support → Show: “Order number,” “Issue description”
- General → Show: “Message” (simple textarea)
Product Selection
Trigger: “Which product are you interested in?”
- Product A → Show Product A options/questions
- Product B → Show Product B options/questions
- Not sure → Show: “Please describe what you’re looking for”
Country-Based Fields
Trigger: “Country”
- United States → Show: “State” dropdown, ZIP code format
- Canada → Show: “Province” dropdown, postal code format
- United Kingdom → Show: “County,” UK postcode format
Event Registration
Trigger: “Will you attend the dinner?”
- Yes → Show: “Meal preference,” “Dietary restrictions”
- No → Skip dinner questions
Quantity-Based
Trigger: “Number of attendees” greater than 1
- Show: “Names of additional attendees”
- Or show additional attendee detail fields
Service Type Selection
Trigger: “Service needed”
- Consultation → Show: “Preferred date/time,” “Topic”
- Quote request → Show: “Project details,” “Budget”
- Technical support → Show: “Product,” “Issue type,” “Screenshots”
Types of Conditional Rules
Show If
Field is hidden by default, appears when condition is met:
- Show “Spouse name” IF “Marital status” = “Married”
Hide If
Field is visible by default, hides when condition is met:
- Hide “Company name” IF “Account type” = “Personal”
Comparison Operators
| Operator | Meaning | Example |
|---|---|---|
| Equals | Exact match | Country = “USA” |
| Not equals | Anything except | Status ≠ “Student” |
| Contains | Text includes | Email contains “@company.com” |
| Is empty | No value entered | Phone is empty |
| Is not empty | Has any value | Comments is not empty |
| Greater than | Numeric comparison | Quantity > 5 |
| Less than | Numeric comparison | Age < 18 |
Multiple Conditions (AND/OR)
AND Logic
All conditions must be true:
Show “Senior discount code” IF Age ≥ 65 AND Membership = “Active”
OR Logic
Any condition can be true:
Show “Urgent contact” IF Priority = “High” OR Issue = “System Down”
Planning Conditional Forms
Step 1: List All Fields
Write out every field you might need:
- Required for everyone
- Required for some
- Optional for some
Step 2: Identify Trigger Questions
Which questions determine what else to show?
- Yes/No questions
- Category selections
- Type dropdowns
Step 3: Map the Logic
Create a simple flowchart or list:
Question 1: Account Type
├── Personal → Show: Personal fields
└── Business → Show: Business fields
    └── Business Size
        ├── Small (1-10) → Show: Small biz questions
        └── Large (11+) → Show: Large biz questions
Step 4: Keep It Simple
Avoid over-complicating:
- 1-2 levels of conditions usually enough
- Too many branches confuse everyone
- Test thoroughly after building
Setting Up Conditional Logic
With Auto Form Builder’s Conditional Logic add-on, here’s how to create dynamic forms:
Step 1: Install Auto Form Builder
- Go to Plugins → Add New
- Search for “AFB” (the short name for Auto Form Builder)
- Find “AFB – Auto Form Builder – Drag & Drop Form Creator“
- Click Install Now, then Activate
Step 2: Create Your Form
- Add all fields you’ll need (including conditional ones)
- Set up your trigger field (dropdown, radio, checkbox)
- Add the fields that will show/hide
Step 3: Configure Conditions
- Select the field to show/hide
- Open conditional logic settings
- Set the rule:
- Choose trigger field
- Select operator (equals, contains, etc.)
- Enter the value to match
- Choose action (show/hide)
Step 4: Test Thoroughly
- Preview the form
- Test each trigger option
- Verify correct fields appear/disappear
- Test on mobile
- Submit test entries
Best Practices for Conditional Forms
1. Start with the Trigger
Place trigger questions before dependent fields:
- Users answer the trigger first
- Dependent fields appear below/after
- Logical flow from top to bottom
2. Use Clear Trigger Options
Trigger fields should have distinct options:
- Dropdowns with clear categories
- Radio buttons for Yes/No
- Avoid ambiguous options
3. Don’t Over-Branch
Too many conditions create problems:
- Hard to test all paths
- Easy to create logic errors
- Confusing for users
Rule of thumb: If your logic map looks like a maze, simplify.
4. Consider Required Fields
When fields are conditionally shown:
- They should only be required when visible
- Hidden fields shouldn’t block submission
- Test required validation with conditions
5. Group Related Fields
Show/hide groups together:
- If “Business” → Show company name, title, and size together
- Not one field at a time
- Cleaner appearance
6. Provide Default Paths
What if user doesn’t select anything?
- Consider default option
- Or make trigger field required
- Ensure form is complete-able
7. Test All Paths
Every combination needs testing:
- Each trigger option
- Combined with other conditions
- On different devices
- Actual form submissions
Common Mistakes to Avoid
Mistake 1: Logic Loops
Field A shows Field B, Field B shows Field A:
- Creates infinite loop
- Form may break or behave oddly
- Keep logic flowing one direction
Mistake 2: Orphaned Fields
Conditional fields that can never appear:
- Condition references deleted field
- Impossible condition combination
- Review logic when editing forms
Mistake 3: Required Hidden Fields
Required field that’s hidden prevents submission:
- User can’t see or fill it
- Form won’t submit
- Only require fields when they’re visible
Mistake 4: Too Complex
5+ levels of nested conditions:
- Nearly impossible to test
- Bugs are inevitable
- Simplify the form design instead
Mistake 5: Not Testing All Paths
Testing only the “happy path”:
- Test every trigger option
- Test edge cases
- Test on mobile
- Test actual submissions
Real-World Form Examples
Job Application Form
Fields for everyone:
- Name, Email, Phone
- Position applying for
- Resume upload
Conditional fields:
- IF Position = “Developer” → Show: “GitHub URL,” “Programming languages”
- IF Position = “Designer” → Show: “Portfolio URL,” “Design tools”
- IF Position = “Manager” → Show: “Years of management experience,” “Team size managed”
Quote Request Form
Fields for everyone:
- Name, Email, Company
- Service type (dropdown)
Conditional fields:
- IF Service = “Web Design” → Show: “Current website URL,” “Page count needed”
- IF Service = “SEO” → Show: “Target keywords,” “Current rankings”
- IF Service = “Maintenance” → Show: “Current platform,” “Issues experienced”
Event Registration
Fields for everyone:
- Name, Email
- Sessions attending (checkboxes)
Conditional fields:
- IF Workshop A checked → Show: “Workshop A preferences”
- IF Attending dinner = Yes → Show: “Meal selection,” “Dietary restrictions”
- IF Bringing guest = Yes → Show: “Guest name,” “Guest meal selection”
Conditional Logic Without Coding
The beauty of modern form builders: no code required.
Visual Interface
- Point and click to set conditions
- Dropdown menus for operators
- Live preview of changes
No JavaScript Required
- Plugin handles the logic
- Works across browsers
- Mobile compatible
Easy to Modify
- Change conditions anytime
- Add new branches easily
- No developer needed
Frequently Asked Questions
What is conditional logic in forms?
Conditional logic automatically shows or hides form fields based on how users answer previous questions. It creates dynamic forms that adapt to each user.
Why should I use conditional fields?
Conditional fields make forms shorter and more relevant. Users only see questions that apply to them, improving completion rates and data quality.
Can I have multiple conditions on one field?
Yes, you can combine conditions with AND (all must be true) or OR (any can be true) logic.
What happens to hidden field data?
Hidden fields typically aren’t submitted. If a user triggers a field, fills it in, then changes the trigger (hiding the field), the data may or may not be included depending on the form builder.
Is conditional logic available in the free version?
In Auto Form Builder, conditional logic is available as a Pro add-on. The free version includes all essential form features, with conditional logic as an upgrade for advanced forms.
Summary
Creating conditional forms:
- Plan your logic – Map trigger questions and dependent fields
- Keep it simple – 1-2 levels of conditions usually enough
- Set up trigger fields – Clear options (Yes/No, categories)
- Configure conditions – Show/hide based on trigger values
- Handle required fields – Only require when visible
- Test all paths – Every trigger combination
- Test on mobile – Ensure it works everywhere
Conclusion
Conditional logic transforms static forms into smart, adaptive experiences. Users see only relevant questions, forms feel shorter, and you collect better data. What once required custom coding is now point-and-click simple.
Auto Form Builder’s Conditional Logic add-on makes it easy to create dynamic forms without writing code. Set up triggers, define conditions, and watch your forms adapt to each user’s answers.
Ready for smarter forms? Download Auto Form Builder and explore the Conditional Logic add-on to create forms that adapt to your users.